
Today's recipe was an improvised one. My little cousin Marc was turning five and, not having much time and all I was thinking of making some dinosaur cookies for his party and a normal chocolate cake. But it all changed with a phone call. My uncle (Marc's daddy) was preparing a Pirate-themed party and I quickly realized that my dinosaur cookies would be very out of place.
But then I began thinking and browsing Pinterest. I could do some pirate and starfish cookies.
And I did them.

I'm not exactly proud of the pirate ones but I absolutely loved the starfishes. Aren't they adorable? And very easy too, I just used a normal star cookie cutter and then I modified them myself, making them more starfish-like.
However I was not satisfied. A normal cake would simply not do and I started browsing Pinterest again taking advantage of my insomnia for once. And then I found it. A Pirate Ship, of course! Here you have the pins I got my ideas from: Pirate Ship Cake and Pirate cookies.

And this was the result. I bought a couple of gummy dolphins and some chocolate coins and that's it! It was a little bit rushed and if I had had more time I would have added more details but I did the cake in one morning and it was everything I could have hoped for.
Here it is the recipe and following up, a step-by-step of the ship construction!
Chocolate
Cake
Ingredients
(yields a Pirate cake)
- 250g sugar
- 8 eggs
- 160g flour
- 90g powder cocoa
Note
that these quantities are for only ONE of the cakes, you need to do
it twice in order to follow my directions for the Pirate Cake.
Directions
- Pre-heat the oven at 180ºC (356ºF).
- Grease a rectangular cake pan with butter and sprinkle with flour. My cake pan was 35x27cm.
- Beat together the eggs and the sugar until the mix triples its size.
- Sieve together cocoa and flour and add it to the eggs by hand. The spatula has to follow a circular pattern from the top of the bowl towards the bottom, incorporating the flour and cocoa slowly so the dough does not have lumps.
- Pour the mix into the cake pan and bake for 15 minutes (until when inserting a toothpick, it comes out clean).
- Let it sit for 10 minutes and transfer into a rack to cool. Once it has cooled, wrap it in plastic film and put it in the fridge overnight (or two hours in the freezer). Be sure to wrap it perfectly so it does not get dry.

Syrup
Ingredients
- 100mL water
- 100g sugar
Directions
- Mix the water and sugar in a saucepan over medium heat.
- Bring to a boil until the sugar has dissolved.
Nocilla/Nutella
Frosting
Ingredients
- 240g butter (room Tº)
- 200g confectioners sugar
- 250g Nocilla/Nutella
- ¼ tsp salt
- 1 tsp vanilla extract
- 2 Tbs heavy cream
Directions
- Whip together butter and sugar at medium speed. Add Nutella or Nocilla and beat for 2 minutes. Add salt and vanilla and beat for 30 seconds and finally add the cream and beat for 2 minutes.

Bear in mind that, in addition of every ingredient that I listed in the recipe, you will also need some Smarties and some Mikados for the construction of the ship.
And now, the step by step. I started carving the shape of the pirate ship. It's easier if the cake is slightly frozen, you will see that it is thawed pretty fast.
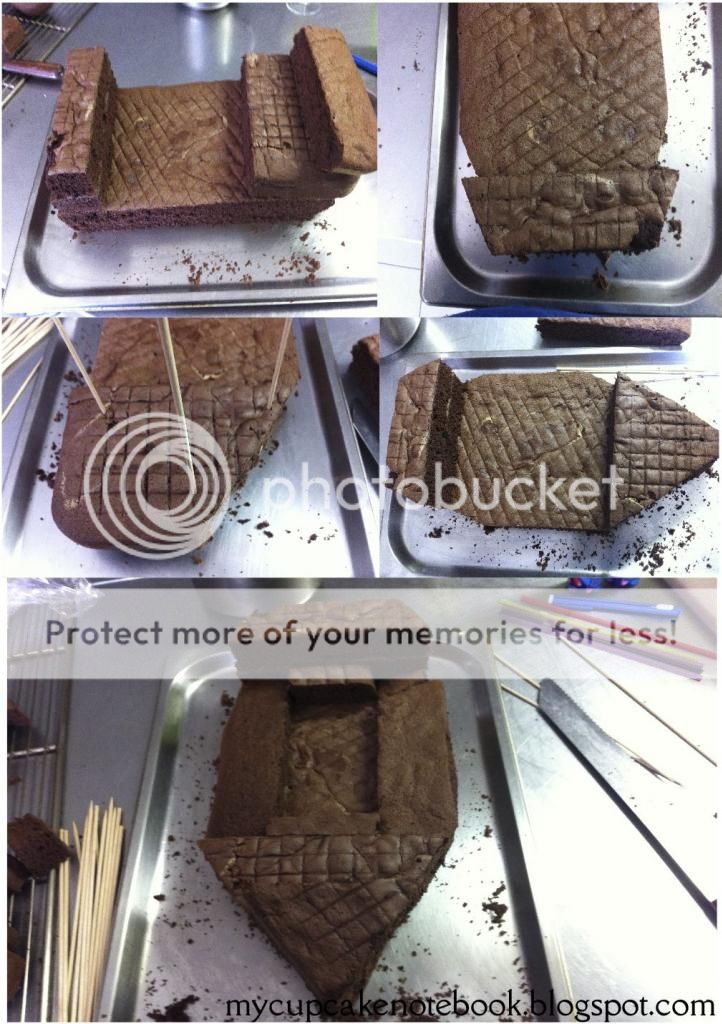
I used a serrated knife and some wooden skewers (I took them off afterwards). There will be a lot of leftovers, you can always make some cakeballs!

When I was absolutely sure of the final form of the ship I dismantled it and began the whole syrup and frosting process. I halved each layer of the cake horizontally with a serrated knife and I poured syrup with a spoon (you can also use a silicone brush or a bottle) and I put a thin layer of frosting with a spatula.

As you can see, I did this with every layer of the cake and when it was completed, I covered it all with frosting. I had to put some Mikado sticks (they are like breadsticks covered in milk chocolate) in order to stabilize some layers (basically in the stern) and then I also used them to make some handrails and a prison for some Smarties!

After finishing the decoration, I stored the cake in the fridge.

The cake was moist and delicious, everyone had a slice (kids and parents) and just the stern was left after the party.

I hope you find those explanations useful! Here you have the pdf of the recipe, as always, including how to make the syrup and the frosting.

Did you like it? Do you want to make it but have any doubts? Please, comment!!! I will be happy to answer any questions you may have!
Anna
No comments:
Post a Comment